[macOS] Ripping CD and Converting to FLAC

It has been a long time since I rip a CD to FLAC files and I used to do this on Windows. Now my primary system is macOS, I want to find out how to do this on a Mac.

(https://xiph.org/flac/links.html#software)

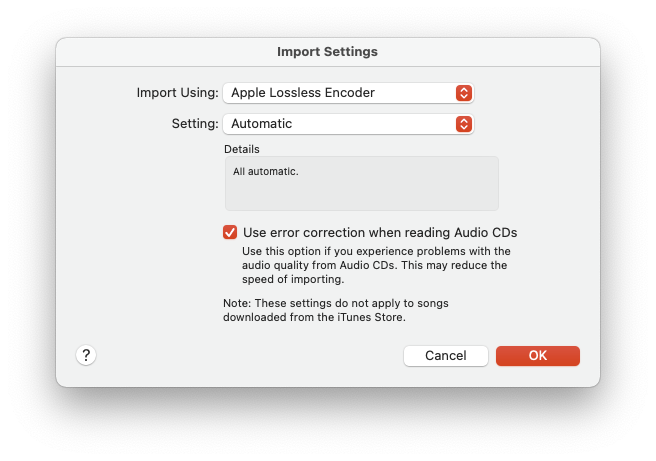
I decided to use macOS Music/iTunes to extract tracks from CD to Apple Lossless Audio Codec(AAC):

A Better CD Encoder(ABCDE)
with Homebrew installed, “brew install abcde”

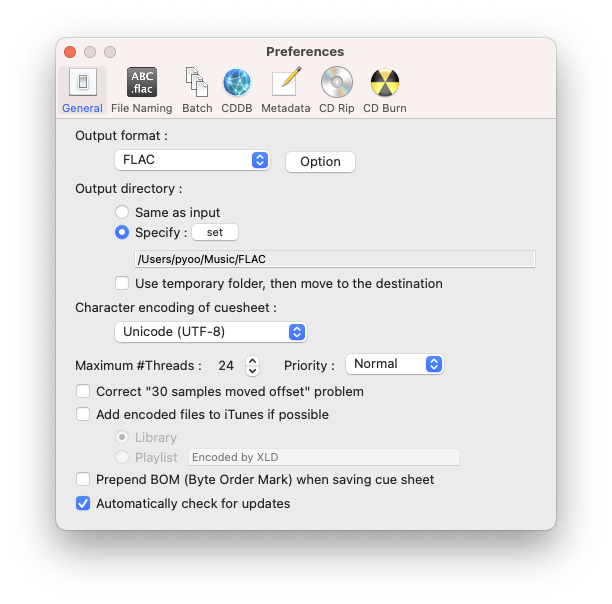
X Lossless Decoder(XLD) – just run it once and set the Output format and directory then open the AAC files with XLD and it will convert them to FLAC automatically

[HowTo] OS X – How to change hostname

(Source: https://knowledge.autodesk.com/support/smoke/learn-explore/caas/sfdcarticles/sfdcarticles/Setting-the-Mac-hostname-or-computer-name-from-the-terminal.html)

Procedure

Perform the following tasks to change the workstation hostname using the scutil command.

  1. Open a terminal.
  2. Type the following command to change the primary hostname of your Mac:
    This is your fully qualified hostname, for example myMac.domain.com
    sudo scutil –set HostName <new host name>
  3. Type the following command to change the Bonjour hostname of your Mac:
    This is the name usable on the local network, for example myMac.local.
    sudo scutil –set LocalHostName <new host name>
  4. Optional: If you also want to change the computer name, type the following command:
    This is the user-friendly computer name you see in Finder, for example myMac.
    sudo scutil –set ComputerName <new name>
  5. Flush the DNS cache by typing:
    dscacheutil -flushcache
  6. Restart your Mac.

[Mac/OSX] iTunes/Mail Broken Korean Fix

Yet another better/easier method:

App Language Chooser


This should set the default language to Korean on iTunes only:

defaults write -app iTunes AppleLanguages "(ko)"


On OSX with English as the default language, Korean letters will be broken on the iTunes and Mail and here is how to fix that:

defaults write $(mdls -name kMDItemCFBundleIdentifier -raw /Applications/iTunes.app) AppleLanguages "(ko, en)"
defaults write $(mdls -name kMDItemCFBundleIdentifier -raw /Applications/Mail.app) AppleLanguages "(ko, en)"

OSX – Perl CPAN Initialization

In order to install perl modules via CPAN, CPAN needs to be configured on OS X via the following command:

% sudo CPAN

within the cpan shell:

cpan> o conf prerequisites_policy follow
cpan> o conf make /usr/bin/make
cpan> o conf commit

> sudo port selfupdate
> sudo CPAN
cpan> upgrade CPAN
cpan> install Bundle::CPAN
cpan> upgrade
cpan> install YAML
cpan> install Text::xSV

http://beerpla.net/2007/10/12/cpan-the-perl-module-manager/


MacPorts – MustHave

Web Site: http://www.macports.org

OS X is an UNIX OS.  The Aqua GUI is nice an all but in order to get the full potential of OS X, you should know how to work with the Terminal(xterm) and scripts.  Other free *NIXes have developed a nice package system and it is MacPorts that does package managements on OS X.

Requirement:
You need Apple Xcode Development Tools.  Get it from AppStore(Link):
AppleStore-Xcode

It is free!!!  After it is installed, you need to accept Xcode EULA by either running xcode or entering the following command in the Terminal:

% xcodebuild -license

Go to Applications then double click on the Xcode so it gets installed on the system.

Xcode-Welcome

Now the Command Line Tools needs to be installed.  Go to Xcode->Preferences->Downloads:

Xcode-Pref-Downloads

Click on the “Install” button next the the Command Line Tools.


Now, MacPorts can be installed via .pkg/.dmg and the links are:
Mountain Lion: https://distfiles.macports.org/MacPorts/MacPorts-2.1.2-10.8-MountainLion.pkg
Lion: https://distfiles.macports.org/MacPorts/MacPorts-2.1.2-10.7-Lion.pkg
Snow Leopard: https://distfiles.macports.org/MacPorts/MacPorts-2.1.2-10.6-SnowLeopard.pkg
Leopard: https://distfiles.macports.org/MacPorts/MacPorts-2.1.2-10.5-Leopard.dmg

After downloading the .pkg/.dmg, simply double-click on it to get it installed.

Self update: in a Terminal type the following:

% sudo port -v selfupdate


x-rite i1 Display Pro Calibration – OSX

Manufacturer’s web site: http://www.xrite.com/product_overview.aspx?ID=1454

Forget the CD that comes with the calibrator, instead go to the manufacturer’s support page for the latest version of the software.  In this case http://www.xrite.com/product_overview.aspx?ID=1454&Action=support&SoftwareID=1164 – download i1Profiler_v131.mpkg(you want to save it as .zip file) and open up the Downloads folder in the finder and double click on it then it will unzip and create a i1Profiler.mpkg file for you, double click on the i1Profiler.mkpg.

i1Profiler-Install

After installation is done, you must reboot the computer.

i1Profiler-InstallDone

After everything is done. go ahead and run “i1Profiler” Applications -> i1Profiler

From here on, it will be the same procedure as Windows : http://yootopia.com/mystory/wp/2013/01/05/x-rite-i1-display-pro-calibration-windows/