[HowTo] Windows 11 Setup –

3DP Net NIC driver – https://www.3dpchip.com/3dpchip/3dp/net_down_en.php
3DP Net detects ethernet card automatically and provides the newest or the most suitable drier. It supports off-line installation.

Winaero Tweaker – https://winaero.com/winaero-tweaker/
Winaero Tweaker is a free app for all versions of Windows that lets you adjust (i.e. tweak) hidden secret settings that Microsoft does not let you adjust from the user interface. In addition, it allows you to add extra value to existing Windows apps and tools with advanced context menus, options, and handy commands.

PotPlayer – https://potplayer.daum.net/

HoneyView – https://en.bandisoft.com/honeyview/

Everything – https://www.voidtools.com/

EarTrumpet – https://eartrumpet.app/

CBX Shell – https://www.softpedia.com/get/System/OS-Enhancements/CBX-Shell.shtml

Parsec – https://parsec.app/

CCleaner Portable – https://www.ccleaner.com/ccleaner/builds

TreeSize – https://www.jam-software.com/treesize_free?ca=1

AppCheck – https://www.checkmal.com/

Malware Zero – https://malzero.xyz/

[HowTo] APC Masterswitch AP9211 with AP9606 Firmware Upgrade

I have a few old APC Masterswitch Power Controller with AP9606 Web/SNMP Management Card stored away in my garage for years…

Finally I found some use for them and I wanted to update the firmwares before I install them for good.

What’s needed:
Tripp-Lite USB to DB9 Adapterhttps://www.tripplite.com/support/usa19hs
Plugable USB Serial Adapter – https://plugable.com/products/pl2303-db9
DB9 Null Modem Female to Female adapter – https://a.co/d/dl8Q76C

On MacOS(Monterey v12.5), I had to download and install the driver for Tripp-Lite USB to DB9 adapter and use the following command to connect to APC Masterswitch:

screen /dev/tty.usbserial-1410 2400,cs8,-ixon

I did some web searching and found the following firmwares:

  • aos309a.bin – APC OS for AP9606(download link below)
  • ms225a.bin – Masterswitch Application(download link below)

I followed the ftp instruction for firmware update – https://www.apc.com/us/en/faqs/FA156047/

First, once I get logged into the AP9606 via Serial connection, I figured out the MAC address then assigned IP via BOOTP with:

apc -s 192.168.?.? <MAC Address>

Then uploaded MasterSwitch APP, v2.2.5.a via ftp then Web/SNMP Management Card AOS v3.0.9.a then disabled BOOTP and configured static IP TCP/IP

[macOS] Ripping CD and Converting to FLAC

It has been a long time since I rip a CD to FLAC files and I used to do this on Windows. Now my primary system is macOS, I want to find out how to do this on a Mac.

(https://xiph.org/flac/links.html#software)

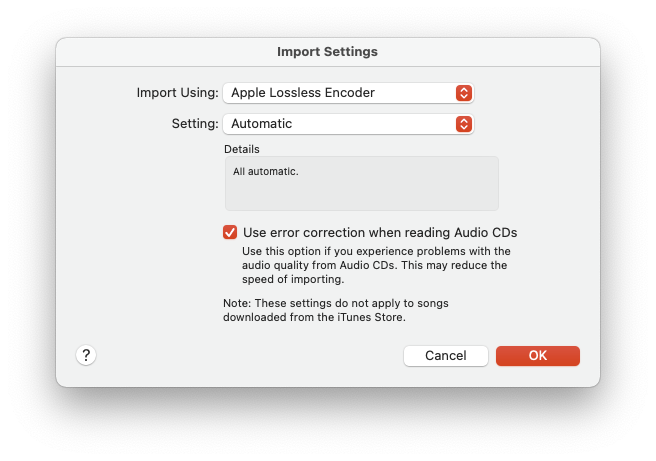
I decided to use macOS Music/iTunes to extract tracks from CD to Apple Lossless Audio Codec(AAC):

A Better CD Encoder(ABCDE)
with Homebrew installed, “brew install abcde”

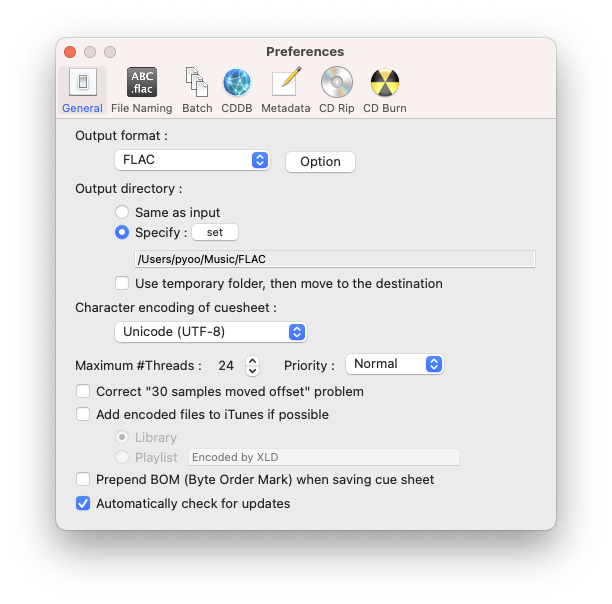
X Lossless Decoder(XLD) – just run it once and set the Output format and directory then open the AAC files with XLD and it will convert them to FLAC automatically

[HowTo] OS X – How to change hostname

(Source: https://knowledge.autodesk.com/support/smoke/learn-explore/caas/sfdcarticles/sfdcarticles/Setting-the-Mac-hostname-or-computer-name-from-the-terminal.html)

Procedure

Perform the following tasks to change the workstation hostname using the scutil command.

  1. Open a terminal.
  2. Type the following command to change the primary hostname of your Mac:
    This is your fully qualified hostname, for example myMac.domain.com
    sudo scutil –set HostName <new host name>
  3. Type the following command to change the Bonjour hostname of your Mac:
    This is the name usable on the local network, for example myMac.local.
    sudo scutil –set LocalHostName <new host name>
  4. Optional: If you also want to change the computer name, type the following command:
    This is the user-friendly computer name you see in Finder, for example myMac.
    sudo scutil –set ComputerName <new name>
  5. Flush the DNS cache by typing:
    dscacheutil -flushcache
  6. Restart your Mac.

Volumio – Audio Media Player – Remote Control

I have been using Volumio on Raspberry Pi since Volumio version Beta 1.1 and I am happy with it that I can play my FLACs and MP3s directly from my home Free4NAS server via SMB mounts.

With my recent home audio upgrades, I want to control Volumio with remote control so I look for that info on the web.

https://volumio.org/forum/how-installed-lirc-with-receiver-and-remote-volumio-t360.html
https://volumio.org/forum/using-remote-with-volumio-t1923.html

My MCE remote is Rosewill RRC-126: http://amzn.com/B003WM5J0O

Installing lirc package:

 > ssh pi@volumio
 (password is raspberry)
 > sudo apt-get update
 > sudo apt-get install lirc

Testing:

 > mode2 -d /dev/lirc0

Now, if you press any button on the remote, you should see a bunch of pulse/space messages.

Editing /etc/lirc/hardware.con:

 > sudo vi /etc/lirc/hardware.conf
 
 # /etc/lirc/hardware.conf
 #
 # Arguments which will be used when launching lircd
 LIRCD_ARGS="--uinput" 
 
 #Don't start lircmd even if there seems to be a good config file
 #START_LIRCMD=false
 
 #Don't start irexec, even if a good config file seems to exist.
 #START_IREXEC=false
 
 #Try to load appropriate kernel modules
 LOAD_MODULES=true
 
 # Run "lircd --driver=help" for a list of supported drivers.
 DRIVER="default"
 # usually /dev/lirc0 is the correct setting for systems using udev
 DEVICE="/dev/lirc0"
 MODULES="mceusb"
  
 # Default configuration files for your hardware if any
 LIRCD_CONF=""
 LIRCMD_CONF=""

Now we need to learn lirc with IR commands:
http://lirc-remotes.sourceforge.net/remotes-table.html

 > sudo /etc/init.d/lirc stop
 > irrecord -n -d /dev/lirc0 ~/lircd.conf

Now copy this newly created lircd.conf

 > sudo mv /etc/lirc/lircd.conf /etc/lirc/lircd.conf.orig
 > sudo mv ~/lircd.conf /etc/lirc/lircd.conf

(for my Rosewill MCE USB dongle remote, I am using mceusb.lircd.conf)

Now start lircd

 > sudo /etc/init.d/lirc start

Testing Config file:

 > irw

Creating .lircrc file:

 > vi /home/pi/.lircrc
begin
  remote = mceusb
  button = KEY_PAUSE
  prog   = irexec
  config = mpc toggle
end
begin
  remote = mceusb
  button = KEY_NEXT
  prog   = irexec
  config = mpc next;mpc play
end
begin
  remote = mceusb
  button = KEY_AGAIN
  prog   = irexec
  config = mpc prev;mpc play
end
begin
  remote = mceusb
  button = KEY_STOP
  prog   = irexec
  config = mpc stop
end
begin
  remote = mceusb
  button = KEY_PLAY
  prog   = irexec
  config = mpc play
end

Running irexec as a background process:

 > irexec -d

Adding irexec to rc.local to startup after every reboot:

 > sudo vi /etc/rc.local
 (add this before exit 0)
(sleep 3;
sudo -u pi irexec -d
)&

Reboot

[HowTo] perl on Windows – ActivePerl

I am a huge fan of perl scripting language and I have scripts that I want to run on Windows and I use ActiveState’s ActivePerl

ActiveState ActivePerl

During installation, do not change any of the settings, just take all of the default settings and install.

ActivePerl comes with a great tool to manage modules – Perl Package Manager(PPM)

Here is PPM repository for PerlMagick: http://www.bribes.org/perl/

Here are some of the perl modules that I install for my own use:
Image/Magick.pm
Image/ExifTool.pm

Also jhead.exe is needed for JPEG header manipulation – http://www.sentex.net/~mwandel/jhead/

ImageMagick(http://www.imagemagick.org/) also needs to be installed. I had no luck with Dynamic Link Library due to the mogrify.exe giveing “Wrong JPEG library version: library is 70, caller expects 80″… I had to use Static build binary…

[HowTo] ATV2 Removing XBMC Completely

I have been using various devices for home media center and ATV2 is one of the devices that I own.

It has been a while since I have been using XBMC on ATV2 and today, I decided to upgrade it with Kodi.

Instead of upgrade, I have chosen to remove previous installation of XBMC and going with the clean installation of Kodi 14.x

Here is the instruction on how to remove XBMC completely from ATV2:

 apt-get remove org.xmbc.xbmc-atv2
apt-get autoremove
rm -fR /private/var/mobile/Library/Preferences/XBMC
rm -fR /private /var/stash/Applications/XBMC.frappliance