[HowTo] OS X – How to change hostname

(Source: https://knowledge.autodesk.com/support/smoke/learn-explore/caas/sfdcarticles/sfdcarticles/Setting-the-Mac-hostname-or-computer-name-from-the-terminal.html)

Procedure

Perform the following tasks to change the workstation hostname using the scutil command.

  1. Open a terminal.
  2. Type the following command to change the primary hostname of your Mac:
    This is your fully qualified hostname, for example myMac.domain.com
    sudo scutil –set HostName <new host name>
  3. Type the following command to change the Bonjour hostname of your Mac:
    This is the name usable on the local network, for example myMac.local.
    sudo scutil –set LocalHostName <new host name>
  4. Optional: If you also want to change the computer name, type the following command:
    This is the user-friendly computer name you see in Finder, for example myMac.
    sudo scutil –set ComputerName <new name>
  5. Flush the DNS cache by typing:
    dscacheutil -flushcache
  6. Restart your Mac.

Gigabit on Volumio 2.0 Raspberry Pi 3

I have been using Raspberry Pi+(Version 1) for years with Volumio 1.x and it has been great but since most of my tracks are FLAC, Gigabit can help.

I almost bought Odroid C2 which has built-in Gigabit network but for the price and purpose of my main usage, I settled with Raspberry Pi+ 3 with USB Gigabit Adapter.

I tried two(2) different USB Gigabit Adapter for Volumio 2.0, Linksys USB 3.0(https://amzn.com/B00LIW8TBG) and TRENDnet USB 3.0(https://amzn.com/B00FFJ0RKE).

The TRENDnet USB 3.0 Gigabit adapter works fine but it has a bit of issue with providing steady stream of the data so I hear “chirps” during play.

The Linksys USB 3.0 Gigabit adapter does not have that problem.

Here is what I had to do to Volumio 3.0 in order to recognize and use USB Gigabit adapter:

/etc/network/interfaces:
auto eth1
allow-hotplug eth1
iface eth1 inet dhcp


Volumio – Audio Media Player – Remote Control

I have been using Volumio on Raspberry Pi since Volumio version Beta 1.1 and I am happy with it that I can play my FLACs and MP3s directly from my home Free4NAS server via SMB mounts.

With my recent home audio upgrades, I want to control Volumio with remote control so I look for that info on the web.

https://volumio.org/forum/how-installed-lirc-with-receiver-and-remote-volumio-t360.html
https://volumio.org/forum/using-remote-with-volumio-t1923.html

My MCE remote is Rosewill RRC-126: http://amzn.com/B003WM5J0O

Installing lirc package:

 > ssh pi@volumio
 (password is raspberry)
 > sudo apt-get update
 > sudo apt-get install lirc

Testing:

 > mode2 -d /dev/lirc0

Now, if you press any button on the remote, you should see a bunch of pulse/space messages.

Editing /etc/lirc/hardware.con:

 > sudo vi /etc/lirc/hardware.conf
 
 # /etc/lirc/hardware.conf
 #
 # Arguments which will be used when launching lircd
 LIRCD_ARGS="--uinput" 
 
 #Don't start lircmd even if there seems to be a good config file
 #START_LIRCMD=false
 
 #Don't start irexec, even if a good config file seems to exist.
 #START_IREXEC=false
 
 #Try to load appropriate kernel modules
 LOAD_MODULES=true
 
 # Run "lircd --driver=help" for a list of supported drivers.
 DRIVER="default"
 # usually /dev/lirc0 is the correct setting for systems using udev
 DEVICE="/dev/lirc0"
 MODULES="mceusb"
  
 # Default configuration files for your hardware if any
 LIRCD_CONF=""
 LIRCMD_CONF=""

Now we need to learn lirc with IR commands:
http://lirc-remotes.sourceforge.net/remotes-table.html

 > sudo /etc/init.d/lirc stop
 > irrecord -n -d /dev/lirc0 ~/lircd.conf

Now copy this newly created lircd.conf

 > sudo mv /etc/lirc/lircd.conf /etc/lirc/lircd.conf.orig
 > sudo mv ~/lircd.conf /etc/lirc/lircd.conf

(for my Rosewill MCE USB dongle remote, I am using mceusb.lircd.conf)

Now start lircd

 > sudo /etc/init.d/lirc start

Testing Config file:

 > irw

Creating .lircrc file:

 > vi /home/pi/.lircrc
begin
  remote = mceusb
  button = KEY_PAUSE
  prog   = irexec
  config = mpc toggle
end
begin
  remote = mceusb
  button = KEY_NEXT
  prog   = irexec
  config = mpc next;mpc play
end
begin
  remote = mceusb
  button = KEY_AGAIN
  prog   = irexec
  config = mpc prev;mpc play
end
begin
  remote = mceusb
  button = KEY_STOP
  prog   = irexec
  config = mpc stop
end
begin
  remote = mceusb
  button = KEY_PLAY
  prog   = irexec
  config = mpc play
end

Running irexec as a background process:

 > irexec -d

Adding irexec to rc.local to startup after every reboot:

 > sudo vi /etc/rc.local
 (add this before exit 0)
(sleep 3;
sudo -u pi irexec -d
)&

Reboot

[HowTo] perl on Windows – ActivePerl

I am a huge fan of perl scripting language and I have scripts that I want to run on Windows and I use ActiveState’s ActivePerl

ActiveState ActivePerl

During installation, do not change any of the settings, just take all of the default settings and install.

ActivePerl comes with a great tool to manage modules – Perl Package Manager(PPM)

Here is PPM repository for PerlMagick: http://www.bribes.org/perl/

Here are some of the perl modules that I install for my own use:
Image/Magick.pm
Image/ExifTool.pm

Also jhead.exe is needed for JPEG header manipulation – http://www.sentex.net/~mwandel/jhead/

ImageMagick(http://www.imagemagick.org/) also needs to be installed. I had no luck with Dynamic Link Library due to the mogrify.exe giveing “Wrong JPEG library version: library is 70, caller expects 80″… I had to use Static build binary…

[HowTo] ATV2 Removing XBMC Completely

I have been using various devices for home media center and ATV2 is one of the devices that I own.

It has been a while since I have been using XBMC on ATV2 and today, I decided to upgrade it with Kodi.

Instead of upgrade, I have chosen to remove previous installation of XBMC and going with the clean installation of Kodi 14.x

Here is the instruction on how to remove XBMC completely from ATV2:

 apt-get remove org.xmbc.xbmc-atv2
apt-get autoremove
rm -fR /private/var/mobile/Library/Preferences/XBMC
rm -fR /private /var/stash/Applications/XBMC.frappliance

[MSO] Annoying auto language switching

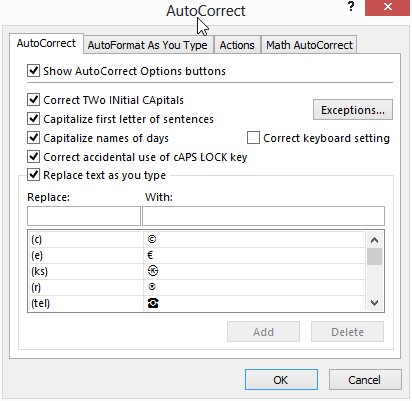
I have Korean language enabled on my Microsoft Office 2013 and in Word/Excel, when I type in something in English that are not in the dictionary, The AutoCorrect would kick in the converts it into Korean!!! Very annoying!!!

Here is how to turn that off:
1. Go to File
2. Options
3. click on Proofing on the left panel
4. click on “AutoCorrect Options…” button
5. under “AutoCorrect” tab, uncheck the box labled “Correct keyboard setting”

AutoCorrectOff